


Your Reliable Deck Light Series Manufacturers
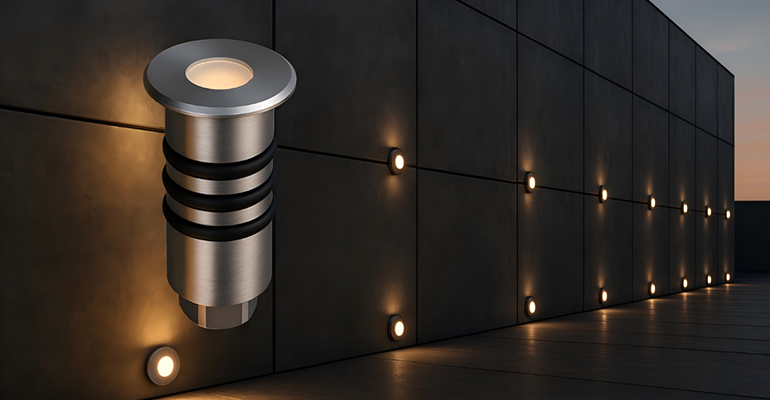
LED deck lights are modern outdoor lighting fixtures designed to illuminate decks, patios, steps, and pathways with energy-efficient LED technology. They provide subtle, low-profile lighting that enhances safety and ambiance while consuming minimal power. Typically made with waterproof and corrosion-resistant materials, these lights are built to withstand outdoor environments. Available in various shapes, colors, and installation types—such as recessed, surface-mounted, or solar-powered—they create elegant visual effects that accentuate architectural features. Ideal for both residential and commercial spaces, LED deck lights combine functionality with decorative appeal, transforming any outdoor area into an inviting nighttime retreat.
Three Major Series Of Application Scenarios


Main Products
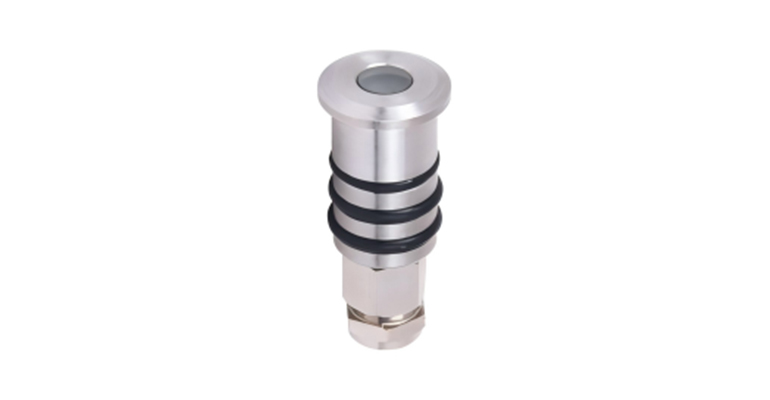
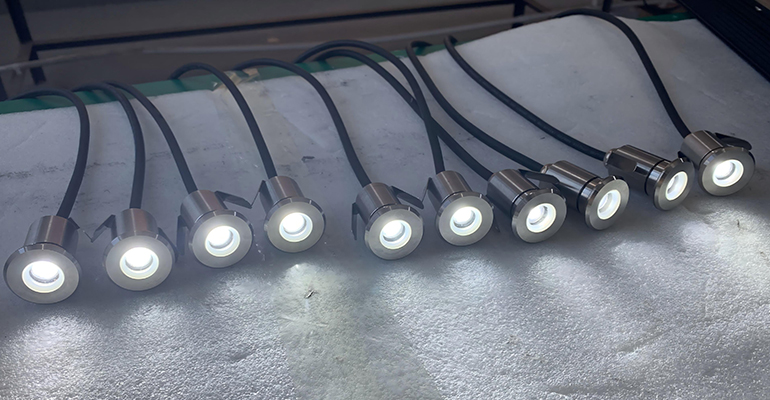
SYA-101 LED Deck Light
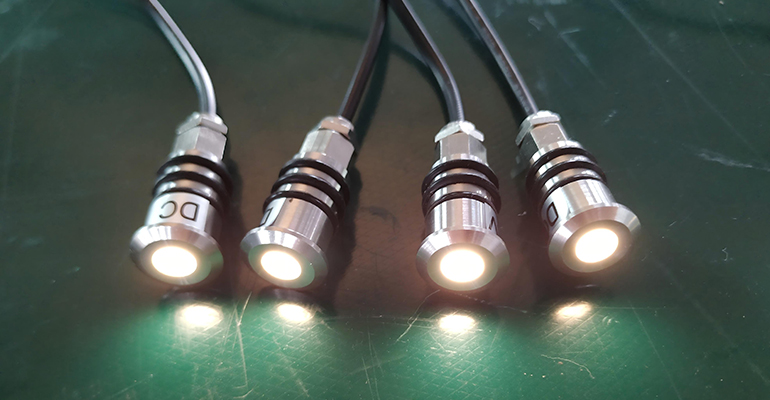
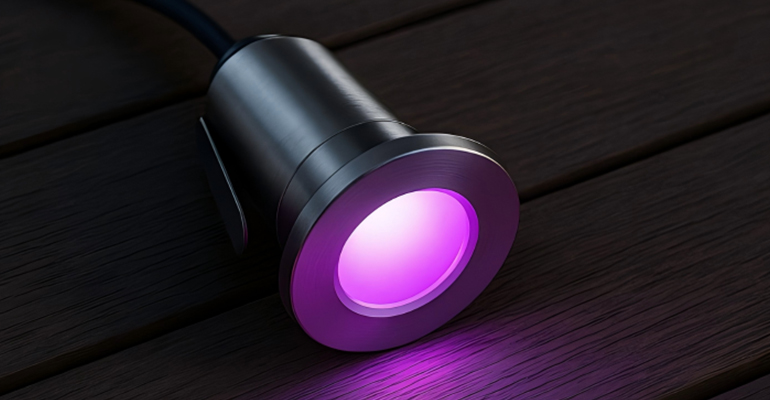
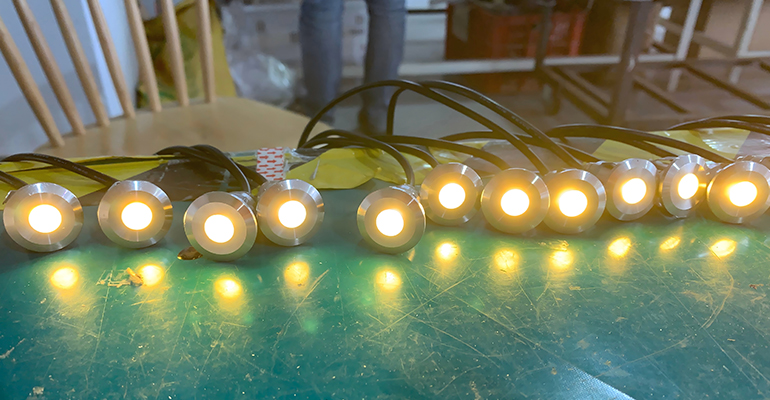
Deck Light Series
SYA Lighting’s Deck Light Series enhances outdoor environments with both beauty and safety. Compact and durable, these fixtures deliver soft, elegant illumination for decks, patios, and pathways.
SYA-102 LED Deck Light
Deck Light Series
SYA Lighting’s Deck Light Series enhances outdoor environments with both beauty and safety. Compact and durable, these fixtures deliver soft, elegant illumination for decks, patios, and pathways.
SYA-103 LED Deck Light
Deck Light Series
SYA Lighting’s Deck Light Series enhances outdoor environments with both beauty and safety. Compact and durable, these fixtures deliver soft, elegant illumination for decks, patios, and pathways.
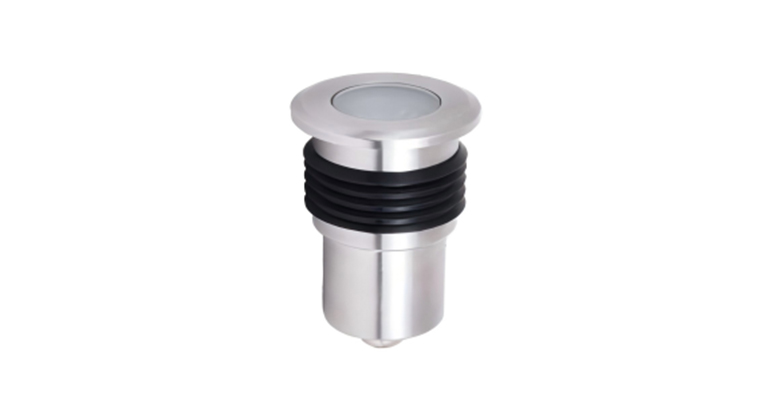
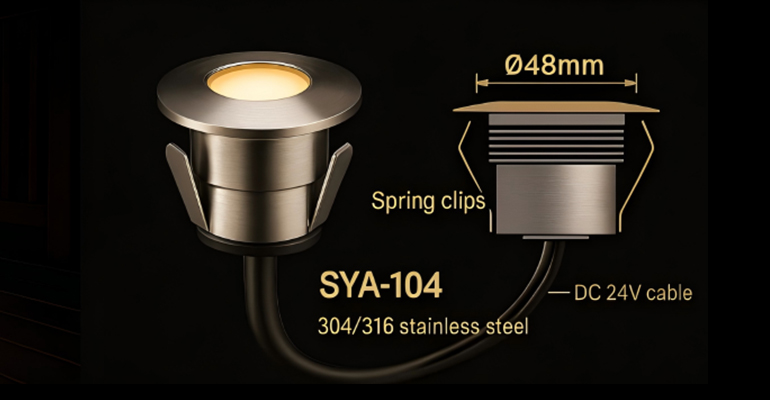
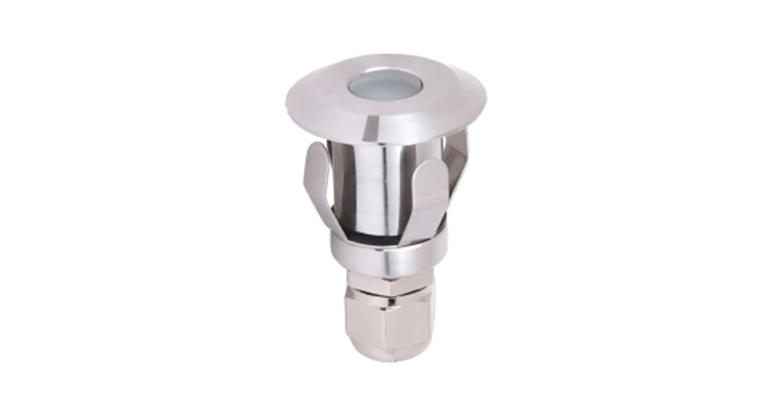
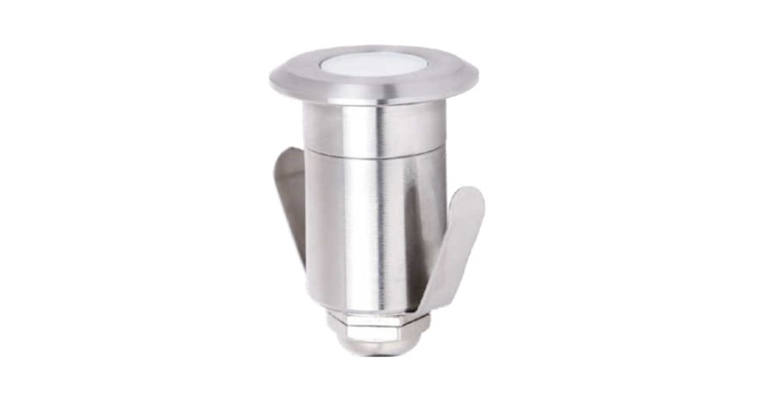
SYA-104 LED Deck Light
Deck Light Series
Ultra slim recessed design perfect for modern pool installations. Features customizable power options and superior build quality with 316L stainless steel construction. Ideal for creating elegant, flush-mounted lighting solutions.
Why Choose Us
Superior Quality & Innovation
Our products are engineered with cutting-edge LED technology and premium materials, ensuring exceptional performance and longevity in the most demanding underwater environments.
International Certifications
CE, RoHS, FCC certified products meeting global standards
Advanced Protection
IP68 continuous immersion, 316L stainless steel housing
Latest Technology
DMX512/RDM control, RGB/RGBW options, high CRI LEDs
Comprehensive Services
FAQ Use & Operation
How to Install Patio Light?
Installing patio light requires a balance of precise installation techniques, safety protocols, and design alignment to create functional, ambient illumination for outdoor living spaces. Whether illuminating a residential garden patio, a boutique hotel terrace, or a commercial café outdoor area, Outdoor Patio Light Fixtures must be installed to withstand outdoor elements, deliver uniform brightness, and blend seamlessly with the landscape or architectural design. A well-executed installation ensures long-term performance, minimal maintenance, and an inviting atmosphere, while following industry standards eliminates risks of electrical failure or water damage. This guide breaks down the step-by-step installation process, key pre-installation planning steps, and critical considerations for outdoor durability, while highlighting the engineering advantages that make professional-grade patio lighting easy to install and built for lasting outdoor performance.
Pre-Installation Planning and Preparation
Site Assessment and Fixture Selection
Begin with a thorough site assessment to map the patio’s layout, identify mounting points, and determine the optimal placement for Outdoor Patio Light Fixtures. Measure the patio’s dimensions to calculate the number of fixtures needed—industry standards recommend one fixture per 8 to 10 square meters for ambient lighting, or one per 5 to 6 square meters for task lighting such as dining or cooking areas. Evaluate the patio’s structural elements (walls, pillars, railings) to identify stable mounting surfaces, and note any obstacles such as trees, furniture, or water features that may impact light distribution.
Select fixtures matched to the patio’s use and environment: low-profile LED models for minimalist design, string or pendant patio lights for casual ambience, and LED Lawn Light for border or pathway illumination surrounding the patio space. Ensure all fixtures have an IP rating of at least IP44 for basic outdoor protection, or IP65 for high-moisture areas near pools, fountains, or coastal regions. SYA Lighting’s patio lighting range includes fixtures with customizable color temperatures (2700K–6000K) and lumen outputs, ensuring alignment with any patio’s aesthetic and functional needs.
Gather Essential Tools and Materials
Installing Outdoor Patio Light Fixtures requires tools engineered for outdoor electrical and mounting work, with corrosion-resistant materials to withstand long-term outdoor exposure. The table below outlines the essential tools and materials, with their core use in the installation process:
| Tool/Material | Primary Installation Use | Key Specification |
|---|---|---|
| 316L Stainless Steel Mounting Hardware | Securing fixtures to walls/pillars | Corrosion-resistant for coastal/humid environments |
| Cordless Impact Drill (18V+) | Drilling mounting holes | Masonry/metal bits for diverse surface types |
| Waterproof Electrical Tape | Sealing wire connections | UV-stabilized for outdoor use |
| Voltage Tester | Verifying power disconnection | Calibrated for low/high-voltage lighting |
| Silicone Sealant | Sealing mounting holes/gaps | Exterior-grade, water/UV-resistant |
| Waterproof Wire Nuts | Connecting electrical wiring | Weatherproof for outdoor connections |
In addition to core tools, prepare a cable management kit (cable clips, conduit) to hide and protect wiring, and a level to ensure straight, uniform fixture mounting—critical for both aesthetic and light distribution consistency.
Electrical Safety Preparation
Electrical safety is non-negotiable for patio light installation. Locate the dedicated outdoor electrical circuit and turn off the power at the main circuit breaker, then verify power disconnection with a voltage tester before any wiring work. For low-voltage patio lighting (12V/24V), use a UL-listed transformer rated for outdoor use, and mount it at least 30 centimeters above ground level to avoid water damage. For hardwired high-voltage fixtures, ensure all wiring is outdoor-rated (UF-B cable) and run through waterproof conduit when exposed to physical damage or moisture. Never daisy-chain more than the manufacturer’s recommended number of fixtures to a single circuit—this prevents overloading and electrical failure.
Step-by-Step Installation for Outdoor Patio Light Fixtures
Step 1: Mark and Drill Mounting Holes
Using the site assessment map, mark the exact mounting points for each fixture with a pencil, ensuring consistent spacing and alignment. Use a level to draw straight lines for linear fixture placement (e.g., along railings or walls) to maintain a polished aesthetic. For masonry surfaces (concrete, stone), drill holes with a masonry bit at a 90-degree angle, with a depth 10mm deeper than the length of the mounting anchors—this accommodates dust and ensures a secure fit. For wooden or metal surfaces, use a metal/wood bit and drill pilot holes to prevent splitting or thread stripping.
After drilling, clear dust from the holes with a brush or compressed air, then apply a small amount of silicone sealant to the holes before inserting anchors—this creates a waterproof barrier and prevents water infiltration into the mounting surface.
Step 2: Mount Fixture Brackets and Secure Base
Attach the mounting brackets (included with all professional-grade Outdoor Patio Light Fixtures) to the drilled holes using 316L stainless steel screws and anchors. Tighten the screws firmly but do not over-tighten, as excessive force can crack masonry or bend metal brackets. Use a level to confirm the brackets are perfectly horizontal/vertical—misaligned brackets cause uneven light distribution and compromise the fixture’s stability.
For freestanding patio lights (e.g., LED Lawn Light for patio borders), insert the fixture’s stake into the ground at the marked points, ensuring the stake is driven at least 20 centimeters deep for stability, especially in windy areas. For pendant patio lights, mount a heavy-duty ceiling hook (rated for the fixture’s weight) to a structural beam or joist—never mount to hollow or weak ceiling materials.
Step 3: Run and Connect Electrical Wiring
For hardwired fixtures, run the outdoor-rated wiring from the power source/transformer to each mounting bracket, using cable clips to secure the wiring to walls, railings, or the ground—keep wiring at least 10 centimeters above ground level to avoid damage from lawn equipment or foot traffic. For low-voltage systems, connect the wiring to the transformer first, then to each fixture, matching positive and negative terminals (red to red, black to black).
Strip 10mm of insulation from the fixture and circuit wires, then connect them with waterproof wire nuts and wrap the connections with two layers of UV-stabilized electrical tape. Tuck all wiring into the fixture’s junction box or a waterproof conduit, then seal the box with its included gasket and cover—this eliminates water and dust ingress to electrical components. For LED Lawn Light and other low-voltage patio border fixtures, use quick-connect waterproof connectors for tool-free wiring, streamlining installation and ensuring a moisture-tight seal.
Step 4: Attach the Fixture and Finalize Sealing
Align the Outdoor Patio Light Fixture with the mounted bracket and secure it using the provided stainless steel hardware. For adjustable fixtures, set the light angle to the desired position—30°–45° for ambient patio illumination, 0° for direct task lighting over dining/cooking areas. After mounting, apply a thin, even bead of silicone sealant around the base of the fixture where it meets the mounting surface, smoothing the sealant with a gloved finger to create a continuous waterproof barrier. This step prevents water from seeping between the fixture and the surface, a leading cause of early fixture failure.
Wipe away any excess sealant or dust from the fixture with a damp cloth to maintain a clean, professional finish—this also ensures the fixture’s lens is clear for optimal light output.
Step 5: Test Power and Adjust Light Distribution
Restore power to the circuit and test each fixture to ensure it turns on and operates at full brightness. Check for flickering or dim lighting, which indicates a loose wiring connection or faulty transformer—correct these issues immediately to prevent electrical damage. For dimmable or color-changing patio lights, test all control functions (dimming, color temperature, RGB effects) to confirm full functionality.
Once the fixtures are operational, adjust the light angles as needed to eliminate glare and ensure uniform coverage across the patio. For LED Lawn Light surrounding the patio, confirm the border illumination creates a soft transition from the patio to the landscape, with no dark spots or overlapping hotspots. Allow the fixtures to run continuously for 24 hours, then inspect the wiring and mounting points for signs of loosening or water leakage—address any issues promptly to maintain long-term performance.
Key Installation Considerations for Long-Term Durability
Weather and Corrosion Protection
All Outdoor Patio Light Fixtures must be installed to withstand outdoor environmental stressors, including rain, UV radiation, humidity, and salt air (for coastal patios). Use only 316L stainless steel mounting hardware and fixtures with UV-stabilized housings—this material resists corrosion and fading far better than standard steel or aluminum, extending the fixture’s lifespan by up to 50% in coastal/humid environments. For patios near pools or fountains, select fixtures with an IP65 or higher rating, and mount all electrical components (transformers, junction boxes) at least 50 centimeters above water level.
Cable Management and Protection
Exposed wiring is not only unsightly but also prone to damage from the elements and physical contact. Use waterproof PVC conduit to run wiring along the ground or exposed surfaces, and secure all wiring with corrosion-resistant cable clips at 30-centimeter intervals. For wiring that crosses walkways, use a low-profile cable cover to protect against foot traffic and lawn equipment. Never run wiring under patio furniture or rugs, as this can cause overheating and damage to the insulation.
Alignment with Landscape and Architectural Design
Patio light installation should complement the existing landscape and architectural design, not detract from it. Mount Outdoor Patio Light Fixtures at a height of 2–2.5 meters for overhead ambient lighting, and 0.5–1 meter for LED Lawn Light border illumination—this height ensures optimal light distribution without creating glare for patio occupants. For modern patios, use low-profile, slim fixtures mounted flush to walls or railings; for traditional or rustic patios, use pendant or lantern-style fixtures for a cohesive aesthetic.
SYA Lighting: Engineering Advantages for Easy Patio Light Installation
SYA Lighting’s Outdoor Patio Light Fixtures and LED Lawn Light range are engineered with installation ease and long-term outdoor performance at the core, drawing on over 15 years of outdoor lighting design expertise. All fixtures feature a tool-friendly modular design with pre-drilled mounting holes and universal bracket compatibility, eliminating the need for custom drilling or modification—this reduces installation time by up to 40% compared to non-standard fixtures. The mounting brackets include adjustable angle settings (0°–90°), allowing for on-site fine-tuning of light direction without additional hardware.
All patio lighting products use high-efficiency LED chips with a luminous efficacy of 120–140 lm/W and a rated lifespan of over 50,000 hours—this means no bulb replacements for 5–7 years of regular use, minimizing maintenance after installation. Exterior fixtures feature IP65 or higher waterproof ratings, die-cast aluminum housings with UV-stabilized powder coatings, and double-sealed silicone gaskets, ensuring protection against rain, dust, and extreme temperatures (-20°C to 60°C). For coastal applications, all hardware is 316L stainless steel, and marine-grade sealants are used to eliminate salt air corrosion.
Comprehensive OEM/ODM customization is available for all patio lighting solutions, including size, shape, color temperature, and lumen output—design concepts are finalized in 30 minutes, with technical drawings produced in 24 hours and mold production in 15 days. This rapid customization ensures fixtures align with any patio’s unique design and lighting needs, from small residential spaces to large commercial hotel terraces. The company’s annual production capacity of over 300,000 units ensures reliable supply for projects of all scales, with consistent quality across all fixtures.
SYA Lighting provides end-to-end installation support for all patio lighting projects, including free professional design consultation from a team of lighting engineers—they offer guidance on fixture placement, spacing, and electrical planning to ensure optimal performance. All products hold CE, RoHS, and FCC global certifications, complying with electrical and environmental regulations in over 50 countries. A standard 3–5 year warranty covers all components, and replacement parts (gaskets, hardware, connectors) are readily available for fast delivery. The 24/7 customer support team is also on hand to answer technical installation questions and provide maintenance guidance, ensuring a seamless installation process from start to finish.
Final Installation Best Practices
To ensure your patio light installation delivers lasting performance and aesthetic appeal, follow these key best practices: always use outdoor-rated electrical components and corrosion-resistant hardware, seal all mounting holes and wiring connections with silicone sealant, and avoid overloading circuits with too many fixtures. Test the entire lighting system for 24 hours before finalizing the installation, and inspect the fixtures and wiring quarterly for signs of loosening, corrosion, or water damage. For LED Lawn Light and border fixtures, clean the lenses every 3 months to remove dust and debris—this maintains optimal light output and prevents heat buildup.
Proper installation transforms Outdoor Patio Light Fixtures into a central feature of outdoor living spaces, delivering safe, ambient illumination that enhances usability and aesthetic appeal. By following industry-standard installation techniques and leveraging the engineering advantages of professional-grade patio lighting, you create a lighting solution that withstands the elements, requires minimal maintenance, and elevates the patio experience for years to come.
What Is a Linear Light Fixture?
A linear light fixture is a specialized architectural and functional lighting solution defined by its elongated, continuous design, engineered to deliver uniform illumination across large surfaces, spaces, or pathways. Unlike traditional point-source lighting that emits light from a single focal point, these fixtures distribute brightness evenly along their entire length, making them ideal for applications where consistent, glare-free light is essential. From commercial building interiors and retail store displays to outdoor landscape pathways and architectural façades, linear light fixtures blend seamlessly with diverse design styles while prioritizing energy efficiency and long-term performance. Wall Wash Linear Light models take this core concept further, integrating the uniform spread of linear lighting with the surface-enhancing properties of wall washing to highlight textures and structural details—combining functionality with aesthetic enhancement for a versatile lighting solution.
At their essence, linear light fixtures are characterized by their form factor and light distribution. Most models feature a slim, low-profile design with lengths ranging from 0.5 meters to 4 meters, allowing for flexible installation in tight spaces or as statement pieces in open areas. The internal LED modules are spaced evenly along the fixture’s length, ensuring a brightness variance of less than 15% across the entire illuminated area—a benchmark set by global lighting standards to eliminate hotspots and shadow lines. This uniform distribution is achieved through precision optical design, including diffused lenses and reflective housings that direct light where it is needed without wasting energy on unnecessary spillage.
Core Characteristics of LED Linear Lights
Uniform Light Distribution and Luminous Efficiency
The primary advantage of LED Linear Lights is their ability to deliver consistent illumination over extended distances, making them the preferred choice for large spaces such as warehouses, conference halls, and retail aisles. Professional-grade models achieve luminous efficacy of 120–140 lumens per watt, 60% higher than traditional fluorescent linear fixtures, translating to significant energy savings without compromising brightness. For example, a 20-watt LED linear fixture produces the same light output as a 40-watt fluorescent model while using half the energy. This high efficiency is paired with a long operational lifespan of over 50,000 hours, reducing maintenance frequency and replacement costs for both residential and commercial applications.
Versatile Design and Installation Options
LED Linear Lights are engineered for adaptability, with a range of installation methods to suit any space. Surface-mounted models attach directly to walls or ceilings, recessed versions fit into ceiling channels for a seamless, minimalist look, and suspended fixtures hang from cables or rods to illuminate open areas. Wall Wash Linear Light variants feature adjustable brackets that allow for precise angle positioning, enabling them to wash vertical surfaces with uniform light while maintaining the slim profile of linear design. The fixtures are also available in a variety of widths and thicknesses, with some models as thin as 15 millimeters, making them suitable for tight spaces such as under-cabinet lighting, stair treads, and architectural recesses.
Durability and Environmental Resistance
For both indoor and outdoor use, LED Linear Lights are built to withstand the demands of their environment. Indoor models feature robust aluminum housings that dissipate heat effectively, keeping operating temperatures below 25°C to extend LED lifespan. Outdoor LED Linear Lights for landscape and architectural use meet IP65 or higher waterproof ratings, with fully sealed housings and silicone gaskets that prevent dust and water ingress. These outdoor models also feature UV-stabilized materials to resist fading and degradation from sunlight, ensuring consistent performance in extreme temperatures ranging from -20°C to 60°C. For coastal environments, corrosion-resistant 316L stainless steel hardware is used to protect against salt air damage.
Customization and Control Capabilities
LED Linear Lights offer extensive customization to match the unique needs of any project. Color temperature options range from 2700K warm white to 6500K cool white, with tunable white models that allow for adjustment between temperatures to suit different moods or activities. RGB and RGBW variants support dynamic color-changing effects, controlled via DMX512, DALI, or smart lighting systems for architectural façades, event spaces, and retail displays. Wall Wash Linear Light models can be customized with specific beam angles (10°–60°) to tailor light distribution to the surface being illuminated, whether highlighting a textured stone wall or a smooth modern façade. The table below outlines key customization options and their applications:
| Customization Feature | Available Options | Primary Application |
|---|---|---|
| Length | 0.5m–4m (custom lengths available) | Warehouses, retail aisles, architectural façades |
| Color Temperature | 2700K–6500K, tunable white | Offices, residential spaces, hospitality venues |
| Beam Angle | 10°–60° (fixed or adjustable) | Wall washing, accent lighting, general illumination |
| Control Methods | On-off, dimming, DMX512, DALI | Event spaces, commercial buildings, smart homes |
| IP Rating | IP20 (indoor), IP65–IP68 (outdoor) | Indoor lighting, landscape pathways, underwater features |
Key Applications of LED Linear Lights
Architectural and Interior Lighting
In architectural design, LED Linear Lights are used to define spaces, highlight structural details, and create visual interest. Recessed models installed along ceiling perimeters or wall edges create the illusion of floating surfaces, while suspended fixtures add depth to open lobbies and atriums. Wall Wash Linear Light variants are ideal for illuminating feature walls, art galleries, and hotel corridors, where uniform surface illumination enhances textures and creates a sophisticated ambiance. In residential settings, under-cabinet LED Linear Lights provide task lighting for kitchens, while stair tread and railing installations improve safety and aesthetic appeal.
Commercial and Industrial Lighting
Commercial spaces such as retail stores, supermarkets, and offices rely on LED Linear Lights for consistent, energy-efficient illumination that enhances productivity and product visibility. Retail aisles benefit from high-brightness models that highlight merchandise, while office environments use tunable white variants to adjust lighting throughout the day, supporting employee well-being and focus. Industrial facilities such as warehouses and manufacturing plants use long-length LED Linear Lights to cover large areas with minimal fixtures, reducing installation and maintenance costs. The durable construction of these fixtures withstands the rigors of industrial environments, including dust, vibration, and temperature fluctuations.
Outdoor and Landscape Lighting
Outdoor LED Linear Lights play a critical role in landscape and architectural lighting, illuminating pathways, building façades, and outdoor entertainment areas. Linear pathway lights create safe, guided illumination for residential gardens, commercial plazas, and hotel walkways, with low-profile designs that blend into the landscape. Façade lighting uses Wall Wash Linear Light models to highlight architectural lines and textures, with RGB variants creating dynamic color effects for landmarks and event venues. Underwater LED Linear Lights for pools, fountains, and ponds feature IP68 waterproof ratings, providing safe, uniform illumination for aquatic features while withstanding constant submersion.
SYA Lighting: Engineering Advantages for LED Linear Lights
SYA Lighting’s LED Linear Lights and Wall Wash Linear Light models are engineered with over 15 years of expertise in outdoor and architectural lighting, combining precision design, premium materials, and advanced technology to deliver exceptional performance. All fixtures use high-quality OSRAM or Epistar LED chips, ensuring consistent brightness, color accuracy, and long lifespan. The integrated heat dissipation system, featuring die-cast aluminum housings and thermal management channels, keeps operating temperatures low, extending LED life to over 50,000 hours and preventing color shift over time.
Customization is a core strength, with comprehensive OEM/ODM capabilities that include size, color temperature, beam angle, and control option customization. Design concepts for custom LED Linear Lights are finalized in 30 minutes, with detailed technical drawings produced within 24 hours and mold production completed in 15 days—enabling rapid turnaround for projects with unique requirements. The company’s annual production capacity of over 300,000 units ensures reliable supply for large-scale commercial, municipal, and hospitality projects, with consistent quality across all fixtures.
All products meet global CE, RoHS, and FCC certifications, ensuring compliance with electrical and environmental regulations in over 50 countries. The company has completed over 500 lighting projects worldwide, including boutique hotels, commercial plazas, and residential landscapes, with a 99% customer satisfaction rate—validating the durability and performance of its LED Linear Lights in diverse environments. Free professional design consultation is available, with a team of lighting engineers providing guidance on fixture selection, placement, and customization to meet the specific needs of any project.
On-site installation support and technical training are offered for large-scale projects, ensuring fixtures are installed correctly to maximize performance. All LED Linear Lights come with a 3–5 year warranty, covering all components including LED chips, drivers, and housings. Replacement parts are readily available for fast delivery, and the 24/7 customer support team is on hand to address technical questions and provide maintenance guidance—ensuring long-term reliability and peace of mind.
The Role of Linear Light Fixtures in Modern Lighting Design
Linear light fixtures have become a cornerstone of modern lighting design, thanks to their versatility, efficiency, and aesthetic appeal. They bridge the gap between functional illumination and design enhancement, adapting to a wide range of spaces and applications while reducing energy consumption and environmental impact. As design trends shift toward minimalist, seamless spaces, the slim profile and uniform light distribution of LED Linear Lights make them an indispensable tool for architects, designers, and lighting professionals.
Wall Wash Linear Light models, in particular, exemplify the fusion of form and function, delivering the surface-enhancing benefits of wall washing with the sleek, continuous illumination of linear design. Whether used to highlight architectural details, guide pathways, or illuminate commercial spaces, these fixtures transform environments by creating cohesive, inviting lighting that meets both functional and aesthetic needs.
Linear light fixtures represent the future of lighting—efficient, customizable, and adaptable to the evolving needs of modern spaces. With engineering that prioritizes performance, durability, and design flexibility, they continue to set the standard for professional lighting solutions, enhancing the beauty and functionality of indoor and outdoor environments worldwide.
Where to Place Wall Wash Lights?
Placing wall wash lights correctly is the cornerstone of creating effective architectural and landscape lighting, as the position of these fixtures directly shapes light distribution, surface illumination uniformity, and the overall aesthetic of interior and exterior spaces. LED Wall Washer Lamp placement must align with the unique dimensions of vertical surfaces, the intended lighting effect, and the functional needs of the space—whether illuminating a commercial building façade, a residential garden wall, or a boutique hotel corridor. Misplacement leads to uneven lighting, harsh hotspots, glare, or under-illumination, undermining the core purpose of wall wash lighting: to create a smooth, seamless glow that highlights textures and structural details without drawing attention to the fixture itself. Understanding the key principles of placement, including height, distance from the wall, and spacing between fixtures, ensures LED Wall Washer Lights deliver optimal performance, while leveraging engineered design advantages makes placement flexible and adaptable to any architectural or landscape design.
Core Placement Principles for LED Wall Washer Lights
Mounting Height: The Foundation of Uniform Illumination
Mounting height is the most critical factor in wall wash light placement, with industry standards dictating specific heights based on the height of the vertical surface and the desired light spread. For exterior walls up to 3 meters in height, the optimal mounting height is 1 to 1.5 meters from the ground—this positions the fixture to cast light evenly from the bottom to the top of the wall, eliminating dark spots at floor level and hotspots near the fixture. For taller exterior walls (3 to 8 meters), mounting heights increase to 2 to 3 meters, and for high-rise building façades over 8 meters, multiple layers of LED Wall Washer Lights are used, with fixtures mounted at 3 to 5 meter intervals vertically to maintain uniform illumination. For interior spaces such as hotel lobbies or gallery walls, mounting height is typically 0.5 to 1 meter from the ceiling or 1.8 to 2.2 meters from the floor, ensuring the light wash is at eye level for optimal visual impact and no glare for occupants.
Distance from the Wall: Controlling Light Spread and Texture
The distance between the LED Wall Washer Lamp and the vertical surface dictates the width of the light wash and the way it highlights surface textures. A narrow distance—15 to 30 centimeters—creates a wall-grazing effect, where light skims the surface to accentuate brick, stone, or wood textures, ideal for architectural feature walls and landscape stone walls. A moderate distance—30 to 60 centimeters—delivers the classic wall wash effect, with light spreading evenly across the surface to create a seamless glow, the standard for commercial building façades, retail store walls, and residential interior walls. For wide vertical surfaces or open landscape areas, a distance of 60 to 90 centimeters is used to expand the light wash coverage, reducing the number of fixtures needed while maintaining uniformity. This distance principle applies to both interior and exterior installations, with minor adjustments for compact spaces such as hallways or narrow garden paths.
Fixture Spacing: Eliminating Gaps and Hotspots
Proper spacing between LED Wall Washer Lights ensures continuous illumination across the entire vertical surface, with no gaps or overlapping hotspots. Industry standards set spacing at 50 to 70 percent of the fixture’s effective light spread distance—for a fixture with a 2-meter light spread, spacing between units is 1 to 1.4 meters. For exterior LED Wall Washer Lights with wide beam angles (60 to 90 degrees), spacing can be increased to 70 to 90 percent of the light spread distance, while narrow beam angles (30 to 60 degrees) require tighter spacing of 40 to 60 percent. For textured surfaces that require wall-grazing, spacing is reduced by 10 to 20 percent to ensure every part of the texture is highlighted, and for smooth, modern surfaces, spacing can be expanded to minimize fixture visibility. Consistent spacing is critical for linear surfaces such as building façades or garden walkway walls, creating a cohesive visual effect that elevates the overall design.
Placement Guidelines for Common LED Wall Washer Light Applications
The following table outlines industry-standard placement guidelines for the most common interior and exterior applications of LED Wall Washer Lights, including mounting height, distance from the wall, and fixture spacing—all calibrated for optimal uniform illumination and aesthetic impact.
| Application | Wall Height (Meters) | Mounting Height (Meters) | Distance from Wall (Centimeters) | Fixture Spacing (Meters) |
|---|---|---|---|---|
| Residential Garden Wall | 1–2 | 0.5–1 | 15–30 | 0.8–1.2 |
| Commercial Building Façade (Low-Rise) | 3–6 | 2–3 | 30–60 | 1.5–2.5 |
| Boutique Hotel Corridor | 2.4–2.7 | 2.0–2.2 | 20–30 | 1.0–1.5 |
| Art Gallery Feature Wall | 2.5–3 | 0.5–1 from ceiling | 30–45 | 1.2–1.8 |
| Public Plaza Landscape Wall | 2–4 | 1–2 | 45–60 | 1.8–2.8 |
| Retail Store Front Wall | 2.7–3.5 | 1.5–2 | 30–45 | 1.4–2.0 |
These guidelines serve as a baseline, with flexible adjustments for unique architectural features such as curved walls, recessed sections, or protruding structural elements. For curved walls, LED Wall Washer Lamp units are mounted with a slightly reduced spacing to follow the curve and maintain continuous illumination, and for recessed walls, the distance from the wall is increased by 10 to 20 percent to ensure light reaches the entire recessed surface.
Key Placement Considerations for Exterior vs. Interior Installations
Exterior LED Wall Washer Lights Placement
Exterior placement requires additional considerations for environmental factors, mounting stability, and light pollution control, in addition to the core placement principles. All exterior LED Wall Washer Lights are mounted on corrosion-resistant brackets fixed to structural elements of the building or landscape, avoiding weak surfaces such as vinyl siding or loose stone. For coastal or high-humidity environments, fixtures are placed at least 50 centimeters above ground level to avoid water splashing and salt air buildup, and for snowy regions, mounting height is increased to prevent snow accumulation from blocking the light. Light pollution control is also critical: exterior fixtures are angled downward by 10 to 15 degrees to avoid upward light spill, and shielded LED Wall Washer Lights are used for residential areas to prevent glare for neighboring properties. For landscape applications such as garden walls or fence lines, fixtures are placed to complement existing landscape lighting, creating a layered effect with path lights and spot lights for a cohesive outdoor design.
Interior LED Wall Washer Lights Placement
Interior placement prioritizes human comfort and aesthetic integration, with a focus on eliminating glare and aligning with interior design styles. LED Wall Washer Lamp units are mounted in recessed channels or on low-profile brackets for modern interiors, ensuring the fixtures are hidden or unobtrusive, and for traditional interiors, fixtures are placed to match architectural details such as crown molding or wainscoting. Glare is eliminated by keeping the light wash above or below eye level for seated or standing occupants—for living rooms and hotel lobbies, this means mounting fixtures at least 2 meters from the floor, and for hallways, fixtures are mounted near the ceiling to cast light downward. Interior placement also accounts for furniture and decor, with fixtures placed to avoid casting light on reflective surfaces such as mirrors or glass art, which can create unwanted hotspots and glare. For commercial interior spaces such as retail stores, fixtures are placed to highlight merchandise displays, with the light wash aligned to the height of shelving and product stands.
SYA Lighting: Engineering Advantages for Flexible LED Wall Washer Light Placement
SYA Lighting’s LED Wall Washer Lights and LED Wall Washer Lamp models are engineered with over 15 years of architectural and landscape lighting expertise, designed to deliver flexible placement options and optimal performance in any interior or exterior application. All fixtures feature adjustable mounting brackets with 0 to 90 degree angle rotation, allowing for on-site fine-tuning of light direction to match unique wall dimensions and design requirements—this flexibility eliminates the need for custom mounting hardware and makes placement adaptable to curved, recessed, or protruding surfaces. The slim, compact design of the fixtures (with widths as low as 40 millimeters for linear models) allows for mounting in tight spaces such as narrow hallways, between architectural columns, and in recessed wall channels, ensuring the fixtures integrate seamlessly with any design without compromising illumination performance.
The company’s LED Wall Washer Lights are built with customizable beam angles (10 to 90 degrees) and lumen outputs, allowing for precise matching of light spread and brightness to the placement requirements of any space. This customization means a single fixture model can be used for multiple applications—from wall-grazing on textured garden walls to wide surface washing on commercial building façades—simplifying inventory and installation for lighting projects. Design concepts for custom LED Wall Washer Lamp units are finalized in 30 minutes, with detailed technical drawings produced within 24 hours and mold production completed in 15 days, ensuring fast turnaround for projects with unique placement needs such as custom architectural façades or large-scale landscape installations. The annual production capacity of over 300,000 units ensures reliable supply for both small residential projects and large commercial/municipal installations, with consistent quality and performance across all fixtures.
All exterior LED Wall Washer Lights feature an IP66 waterproof rating, die-cast aluminum housings with UV-stabilized powder coatings, and 316L stainless steel mounting hardware—providing corrosion resistance and durability in coastal, high-humidity, and extreme temperature environments. The integrated heat dissipation design keeps LED operating temperatures below 25°C, extending the LED lifespan to over 50,000 hours and ensuring consistent light output regardless of placement or environmental conditions. Interior models feature low-profile, fire-resistant housings and dimmable LED technology, allowing for seamless integration with interior lighting control systems and further customization of light output for different placement scenarios.
SYA Lighting offers free professional design consultation for all lighting projects, with a team of experienced lighting engineers providing expert guidance on LED Wall Washer Light placement, fixture selection, and beam angle optimization. On-site installation support is available for large-scale projects, ensuring fixtures are mounted correctly to maximize uniform illumination and minimize glare. All products hold CE, RoHS, and FCC global certifications, complying with electrical and environmental regulations in over 50 countries, and the company’s 500+ completed global projects—including boutique hotels, commercial plazas, and residential landscapes—validate the performance and flexibility of the lighting solutions in diverse placement scenarios. A standard 3 to 5 year warranty covers all components, with replacement parts readily available for fast delivery, ensuring long-term performance for every installation.
Final Placement Best Practices for LED Wall Washer Lights
The most effective wall wash lighting designs combine the core placement principles with creative adaptation to the unique features of the space. Always test the light output and distribution before final mounting—temporarily placing the LED Wall Washer Lamp to adjust the angle and distance ensures optimal uniformity and eliminates hotspots or gaps. For large vertical surfaces, use a combination of mounting heights and beam angles to create a layered light effect, and for small or compact spaces, prioritize a narrow distance from the wall to maximize light coverage with fewer fixtures.
Consistency is key for linear surfaces such as building façades or walkway walls, with uniform mounting height, distance, and spacing creating a cohesive visual effect. For architectural feature walls, use the wall-grazing placement technique to highlight textures and structural details, and for smooth, modern surfaces, opt for a moderate distance to create a seamless, minimalist glow. Whether interior or exterior, placement should always align with the functional and aesthetic needs of the space, with the fixture’s performance tailored to the unique dimensions and design of the vertical surface.
Proper placement transforms LED Wall Washer Lights from simple fixtures into a design tool that elevates architectural and landscape spaces. By following industry-standard principles and leveraging the flexible, customizable design of professional-grade wall wash lighting, every installation delivers a smooth, uniform glow that highlights the beauty of vertical surfaces while meeting the functional lighting needs of the space. The engineering focus on adaptability and performance ensures that wall wash light placement is never a limitation, but rather an opportunity to create stunning, immersive lighting designs for any interior or exterior application.
How Many Lumens Do I Need for Flood Light?
Selecting the correct lumen output for a flood light is a foundational step in designing effective outdoor lighting systems, as lumens directly determine the brightness and coverage of the fixture across residential, commercial, and municipal spaces. Unlike wattage, which measures energy consumption, lumens quantify the actual light emitted by a fixture—making this the critical metric for matching flood light performance to the size of the area, intended use, and environmental conditions. Choosing too few lumens results in inadequate illumination and poor visibility, while excess lumens causes glare, wasted energy, and unnecessary light pollution. Whether illuminating a small backyard, a commercial parking lot, a public plaza, or aquatic features with an LED Underwater Spotlight, understanding the lumen requirements for each application ensures a lighting solution that is functional, efficient, and aligned with industry design standards. This guide breaks down the key factors that dictate flood light lumen needs, provides clear lumen recommendations for common applications, and highlights the engineering advantages that make professional-grade flood lights adaptable to any lumen and coverage requirement.
Key Factors That Determine Flood Light Lumen Requirements
Area Size and Coverage Radius
The total square footage of the area to be illuminated is the primary factor in calculating flood light lumens, with larger spaces requiring exponentially higher lumen outputs to maintain uniform brightness. Flood lights cast light in a wide beam—typically 60 to 120 degrees—creating a coverage radius that varies by fixture design and mounting height. As a general industry standard, outdoor spaces require a minimum of 10 to 20 lumens per square foot for ambient lighting, 30 to 50 lumens per square foot for task and safety lighting, and 60 to 100 lumens per square foot for high-activity commercial or industrial areas. Mounting height also impacts lumen needs: fixtures mounted higher (8 to 15 meters) require higher lumens to cover a larger ground area, while lower-mounted fixtures (2 to 5 meters) use fewer lumens for focused coverage. For aquatic applications such as Underwater Floodlight for fountain features, lumen requirements shift to account for water light absorption, with a 20 to 30 percent increase in lumens needed to achieve the same visible brightness as above-water fixtures.
Lighting Purpose and Activity Level
The intended use of the illuminated area directly shapes lumen needs, as spaces with high foot or vehicle traffic demand brighter, more consistent illumination for safety, while passive ambient spaces require softer, lower-lumen lighting. Residential areas such as backyards, patios, and garden paths are classified as low-activity spaces, with lumen needs focused on ambient visibility and aesthetic enhancement. Commercial spaces including parking lots, retail storefronts, and warehouse yards are high-activity areas, where bright, even lighting is critical for accident prevention and security. Municipal spaces such as public plazas, park trails, and roadways fall into the medium-to-high activity category, with lumen requirements governed by local lighting codes and safety standards. For specialized uses like sports courts or construction sites, lumen needs jump to 100 to 200 lumens per square foot, as these areas demand maximum visibility for fast-paced activity and detailed work.
Environmental and Surface Conditions
Outdoor environmental factors and surface materials impact how light is reflected and perceived, altering effective lumen needs for a flood light. Dark, non-reflective surfaces such as asphalt, dark concrete, and dense foliage absorb more light, requiring 20 to 40 percent higher lumens to achieve the same brightness as light-colored, reflective surfaces like light concrete, pavers, and white stone. Weather conditions also play a role: fog, rain, and snow scatter light, reducing visibility and increasing effective lumen needs for outdoor flood lights in regions with frequent inclement weather. For coastal or humid environments, corrosion-resistant flood light designs are paired with lumen outputs calibrated for salt air and moisture, ensuring consistent brightness even as the fixture ages. For aquatic Underwater Floodlight for pool and pond features, water clarity is an additional factor—murky or tinted water absorbs more light, requiring higher lumens than clear water to maintain visible illumination at depth.
Beam Angle and Mounting Height
Flood light beam angle and mounting height work in tandem to determine coverage and lumen distribution, with wider beam angles and higher mounting heights requiring more lumens for uniform illumination. Narrow beam angles (20 to 60 degrees) focus light into a tight area, making them ideal for highlighting architectural features or small, focused spaces with lower total lumen outputs. Wide beam angles (90 to 120 degrees) spread light across a large area, requiring higher lumens to ensure the outermost edges of the coverage zone have adequate brightness. Mounting a flood light at a greater height increases the coverage area but dilutes light intensity, meaning a higher lumen output is needed to maintain the recommended lumens per square foot. Conversely, a lower mounting height creates a smaller coverage area with more concentrated light, allowing for a lower lumen fixture to achieve the same brightness level.
Lumen Recommendations for Common Flood Light Applications
The following table outlines industry-standard lumen recommendations for the most common flood light applications, accounting for area size, activity level, and surface conditions. All values are based on average mounting heights and reflective surfaces; dark surfaces or inclement weather regions require a 20 to 40 percent lumen increase.
| Application | Area Size (Square Feet) | Recommended Lumens | Mounting Height (Meters) | Key Use Case |
|---|---|---|---|---|
| Residential Backyard | 100–300 | 1,000–3,000 | 2–4 | Ambient garden/patio lighting |
| Residential Driveway | 200–500 | 3,000–6,000 | 3–5 | Vehicle and pedestrian safety |
| Commercial Storefront | 300–800 | 6,000–12,000 | 4–6 | Visibility and brand highlighting |
| Small Parking Lot | 800–2,000 | 10,000–20,000 | 5–8 | Car and pedestrian traffic |
| Public Plaza/Park | 2,000–5,000 | 20,000–50,000 | 6–10 | Community activity and safety |
| LED Underwater Spotlight | 50–200 (aquatic) | 2,000–5,000 | Submerged 0.5–3 | Fountain/pond feature highlighting |
| Underwater Floodlight for Water Features | 200–800 (aquatic) | 5,000–15,000 | Submerged 1–5 | Large pool/fountain ambient lighting |
These recommendations serve as a baseline for lighting design, with professional-grade flood lights offering adjustable lumen outputs and beam angles to fine-tune performance for unique spaces. For irregularly shaped areas or spaces with mixed activity levels, multiple lower-lumen flood lights are preferred over a single high-lumen fixture, as this creates more uniform illumination and reduces glare.
SYA Lighting: Engineering Advantages for Customizable Flood Light Lumen Performance
SYA Lighting’s flood light solutions—including standard above-water fixtures, LED Underwater Spotlight models, and Underwater Floodlight for aquatic design—are engineered with over 15 years of outdoor lighting expertise, prioritizing customizable lumen performance, energy efficiency, and durability for every application. All flood lights use high-efficiency LED chips with a luminous efficacy of 120–140 lumens per watt, 60 percent higher than traditional halogen and fluorescent flood lights, meaning the desired lumen output is achieved with significantly lower energy consumption. This high efficiency translates to reduced operational costs and a smaller carbon footprint, without compromising on brightness or coverage.
Customization is a core strength of the product line, with comprehensive OEM/ODM capabilities that allow for precise lumen tuning, beam angle adjustment, and size customization to match the exact needs of any project. Design concepts for custom flood lights are finalized in 30 minutes, with detailed technical drawings produced within 24 hours and mold production completed in 15 days—enabling rapid turnaround for projects with tight deadlines. The company’s annual production capacity of more than 300,000 units ensures reliable supply for both small residential projects and large-scale commercial/municipal installations, with consistent lumen performance and quality across all fixtures. For aquatic applications, the Underwater Floodlight for pool and fountain features is engineered with IP68 waterproof ratings, 316L stainless steel housings, and lumen outputs calibrated for water absorption, ensuring bright, consistent illumination at any depth.
All flood light fixtures feature robust construction with die-cast aluminum housings, UV-stabilized powder coatings, and tempered glass lenses—providing corrosion resistance, impact protection, and long-term durability in the harshest outdoor and aquatic environments. The integrated heat dissipation design uses the aluminum housing as a passive heat sink, keeping LED operating temperatures below 25°C and extending the LED lifespan to more than 50,000 hours. This long lifespan eliminates the need for frequent bulb replacements, reducing maintenance costs and downtime for all lighting systems. For added flexibility, many flood light models offer adjustable beam angles and dimming capabilities, allowing for on-site fine-tuning of lumen distribution and brightness to match changing lighting needs.
SYA Lighting’s flood light products hold global CE, RoHS, and FCC certifications, ensuring compliance with electrical and environmental regulations in more than 50 countries worldwide. The company has completed over 500 outdoor and aquatic lighting projects across residential, commercial, and municipal spaces—with a 99 percent customer satisfaction rate—validating the performance and durability of the flood light solutions in diverse climates and applications. Free professional design consultation is available for all projects, with a team of lighting engineers providing expert guidance on lumen selection, fixture placement, and beam angle optimization to create the perfect lighting solution for any space. On-site installation support and technical training are also available for large-scale projects, ensuring the flood lights are installed to maximize lumen performance and coverage.
All flood light and aquatic lighting products come with a standard 3 to 5 year warranty, covering all components including LED chips, drivers, and housings. Replacement parts are readily available for fast delivery, and the 24/7 customer support team is on hand to answer technical questions and provide maintenance guidance—ensuring long-term performance and peace of mind for every lighting project.
Final Considerations for Flood Light Lumen Selection
When selecting lumen output for a flood light, it is critical to balance brightness with functionality and environmental responsibility. Over-illuminating a space not only wastes energy but also creates glare, which impairs visibility and contributes to light pollution—an increasingly important consideration in modern lighting design. Working with professional lighting guidelines and leveraging customizable flood light solutions ensures the right lumen output for the space, with no excess brightness or wasted energy.
For mixed-use spaces, layer lighting with different lumen outputs to create zones of brightness that match activity levels: high-lumen flood lights for safety and task areas, and lower-lumen fixtures for ambient and aesthetic lighting. For aquatic projects, pair LED Underwater Spotlight models for feature highlighting with Underwater Floodlight for water features for ambient illumination, creating a balanced, visually appealing aquatic lighting design that is both functional and beautiful.
Ultimately, the right lumen output for a flood light is the one that meets the lighting needs of the space while maintaining energy efficiency and minimizing environmental impact. With professional-grade flood light solutions that offer customizable lumen performance, high efficiency, and long-term durability, designing an effective outdoor lighting system becomes a straightforward process—one that delivers bright, reliable illumination for years to come.
How to Replace an Underwater Pool Light?
Replacing an underwater pool light requires a careful blend of safety protocols, technical precision, and knowledge of aquatic lighting fixture design—critical steps to ensure the new fixture functions reliably, maintains waterproof integrity, and complies with outdoor aquatic lighting safety standards. Submerged LED Underwater Lights for pools operate in one of the most demanding environments, with constant exposure to chlorinated or salt water, pressure changes, and electrical conductivity risks, making improper replacement a source of water leakage, electrical failure, or even safety hazards. A well-executed replacement process not only restores the pool’s lighting functionality but also extends the lifespan of the new fixture, and following industry-standard steps ensures compatibility with existing pool structures and electrical systems.
This guide breaks down the entire replacement process for underwater pool lights, from pre-replacement safety checks to post-installation testing, while highlighting the engineering advantages that make professional-grade aquatic lighting fixtures easy to replace and built for long-term submerged performance.
Pre-Replacement Preparation: Safety and Planning
Prioritize Electrical and Water Safety
The first and non-negotiable step in replacing an underwater pool light is disconnecting all power to the fixture. Locate the dedicated circuit breaker for the pool lighting system and switch it to the off position, then verify power disconnection using a voltage tester—this step eliminates the risk of electrical shock in a wet environment, a critical safety measure for all aquatic lighting work. For pools with hardwired lighting, ensure the circuit is locked out or tagged to prevent accidental reconnection during the replacement process. Additionally, lower the pool water level to at least 150mm below the light fixture; this creates a dry work area, prevents water from entering the electrical junction box, and simplifies the removal of the old fixture. For inground pools with recessed light housings, this water level adjustment is essential to avoid water infiltration into the pool’s structural casing during replacement.
Gather Specialized Tools and Materials
Replacing underwater pool lights requires tools designed for aquatic and electrical work, as standard household tools lack the corrosion resistance and precision needed for submerged fixture installation. Essential tools include a rubber mallet for gentle fixture removal (to avoid cracking the pool’s tile or fiberglass), a stainless steel socket set (to prevent rust in wet conditions), a waterproof silicone sealant rated for aquatic use, a voltage tester, a flathead screwdriver for prying the fixture from its housing, and a clean microfiber cloth for wiping down the fixture housing and sealing surfaces. For materials, have on hand a replacement professional-grade LED underwater pool light with a matching housing size, replacement waterproof gaskets (the original gasket degrades over time and cannot be reused), and stainless steel mounting hardware—316L stainless steel is the industry standard for pool lighting, as it resists corrosion from chlorinated and salt water far better than standard steel or aluminum. The table below outlines the essential tools and materials, with their specific use in the replacement process:
| Tool/Material | Primary Use in Replacement | Key Specification |
|---|---|---|
| Stainless Steel Socket Set | Removing mounting bolts | 316L grade for corrosion resistance |
| Aquatic-Grade Silicone Sealant | Sealing gaskets and housing | UV-stabilized, chlorine/salt water resistant |
| Waterproof Gasket | Creating a moisture-tight seal | Exact match for fixture housing size |
| Voltage Tester | Verifying power disconnection | Calibrated for low-voltage pool lighting |
| Rubber Mallet | Gentle fixture removal | Non-marring head to protect pool surfaces |
Inspect the Fixture Housing and Electrical Junction Box
Before removing the old light, inspect the recessed housing in the pool wall and the external electrical junction box for damage or wear. Check the housing for cracks, loose tile, or broken fiberglass, as these issues must be repaired before installing the new fixture to prevent water leakage. Inspect the junction box for water infiltration, corrosion, or loose wiring—water in the junction box indicates a faulty seal in the old fixture and requires thorough drying and inspection of the wiring before reconnection. For low-voltage pool lighting systems (12V), confirm the transformer is functioning correctly, as a faulty transformer can cause premature failure of the new LED Underwater Lights for swimming pools. Replace any corroded wiring or damaged junction box components before proceeding, as these issues will compromise the performance of the new fixture even if the replacement is done correctly.
Step-by-Step Underwater Pool Light Replacement
Step 1: Remove the Old Fixture
Start by removing the mounting bolts that secure the old pool light to the recessed housing—use the stainless steel socket set and turn the bolts counterclockwise, taking care not to strip the threads (corroded bolts may require a penetrating oil designed for aquatic use). Once the bolts are removed, use a flathead screwdriver to gently pry the fixture from the housing; insert the screwdriver into the gap between the fixture and the pool wall and apply light pressure to release the seal. If the fixture is stuck due to mineral buildup or old sealant, tap the edge lightly with a rubber mallet—never use a metal hammer, as it can crack the pool’s surface or the fixture housing. Once the fixture is loose, pull it out of the housing and set it aside, taking care not to damage the electrical wiring that connects to the junction box.
Step 2: Disconnect Wiring and Clean the Housing
Disconnect the old fixture’s wiring from the junction box—twist off the waterproof wire nuts and separate the fixture wires from the main circuit wires, then cap the main circuit wires with temporary waterproof caps to prevent water damage. Next, thoroughly clean the recessed housing in the pool wall using a microfiber cloth and a mild, non-abrasive cleaner designed for pool surfaces. Remove all mineral buildup, algae, and old sealant from the housing’s sealing surface, as any debris will prevent the new gasket from forming a tight, moisture-tight seal. For housings with stubborn mineral deposits, use a plastic scouring pad (avoid metal pads that scratch the housing) to gently remove buildup, then rinse the housing with clean water and dry it completely with a microfiber cloth. A clean sealing surface is the single most important factor in preventing water leakage after replacement.
Step 3: Prepare the New LED Underwater Pool Light
Unpack the new professional-grade LED underwater pool light and inspect all components for damage—check the glass lens, housing, and wiring for cracks, dents, or fraying, and confirm the waterproof gasket is included and in perfect condition. Apply a thin, even layer of aquatic-grade silicone sealant to the back of the new gasket, then press the gasket firmly onto the fixture’s sealing flange, ensuring it is aligned perfectly with the mounting holes and no air bubbles are trapped between the gasket and the flange. The sealant acts as a secondary waterproof barrier, complementing the gasket and preventing water from seeping into the fixture housing. For low-voltage fixtures, confirm the LED driver is integrated and in good condition—professional-grade pool lights feature sealed, submersible LED drivers that eliminate the need for external drivers and reduce the risk of electrical failure.
Step 4: Install and Secure the New Fixture
Feed the new fixture’s wiring through the recessed housing and into the electrical junction box, then carefully insert the fixture into the housing, aligning the mounting holes with the holes in the pool wall. Press the fixture firmly against the housing to compress the gasket and create an initial seal, then insert the new 316L stainless steel mounting bolts and tighten them with the socket set—tighten the bolts in a crisscross pattern (top to bottom, left to right) to ensure even compression of the gasket. Tighten the bolts firmly but do not over-tighten, as excessive force can crack the gasket, the fixture housing, or the pool’s surface, and it can also create gaps in the seal by compressing the gasket unevenly. Once the bolts are secure, wipe away any excess sealant from around the fixture with a damp microfiber cloth to create a clean, professional finish.
Step 5: Reconnect Wiring and Test for Leaks
Remove the temporary waterproof caps from the main circuit wires and reconnect the new fixture’s wiring—match the wire colors (black to black, white to white, green to green for ground) and twist on new waterproof wire nuts, then wrap the connections with 2 layers of aquatic-grade electrical tape for an extra moisture barrier. Tuck the wiring back into the junction box and close the box with its waterproof cover, ensuring the cover’s gasket is in place and the box is sealed tightly. Refill the pool to its original water level, then inspect the fixture area for water leakage—look for bubbles or water seepage around the fixture’s edge for 24 hours after refilling. Even small leaks indicate an improperly seated gasket or loose mounting bolts and must be fixed immediately to prevent water damage to the pool’s structure or the fixture’s electrical components.
Step 6: Restore Power and Conduct Functional Testing
After confirming no leaks are present, restore power to the pool lighting circuit by switching the circuit breaker back to the on position. Test the new LED underwater pool light to ensure it turns on and operates at full brightness, checking for consistent light output and no flickering (flickering indicates a loose wiring connection or a faulty LED driver). For color-changing or RGB pool lights, test all color modes and brightness levels to confirm full functionality. Allow the light to operate continuously for 48 hours, then inspect the fixture and junction box again for leaks or electrical issues—this extended testing period ensures the fixture is performing reliably in its submerged environment and the seal is holding under normal operating conditions.
SYA Lighting: Engineering Advantages for Easy Replacement and Longevity
SYA Lighting’s LED Underwater Lights for pools are engineered with replacement and long-term submerged performance in mind, drawing on over 15 years of expertise in aquatic and outdoor lighting design. All pool lighting fixtures feature a modular design with standard mounting dimensions, ensuring compatibility with existing pool recessed housings and eliminating the need for custom modifications during replacement—this streamlines the replacement process and reduces installation time by up to 40% compared to non-standard fixtures. The fixtures use 316L stainless steel mounting hardware and corrosion-resistant die-cast aluminum housings, both rated for permanent submersion in chlorinated and salt water, and the integrated LED chips have a rated lifespan of more than 50,000 hours, delivering years of reliable performance with no bulb replacement needed.
Waterproofing is a cornerstone of SYA Lighting’s aquatic lighting design, with all pool lights meeting or exceeding the IP68 waterproof rating—the highest standard for submerged fixtures—meaning they can be continuously immersed in water at depths of up to 5 meters without damage. The fixtures feature double-sealed silicone gaskets and tempered glass lenses that resist impact and chemical corrosion, and every fixture is pressure-tested for water resistance before leaving the factory, ensuring the seal is perfect and leak-free. For easy replacement, the fixtures have a tool-friendly design with clearly marked mounting holes and a detachable wiring harness that simplifies connection to the pool’s electrical system, even for novice installers.
Comprehensive OEM/ODM customization is available for all aquatic lighting fixtures, with size, color temperature, brightness, and color-changing options (RGB/RGBW) tailored to the unique needs of any pool project. Design concepts for custom LED Underwater Lights for inground pools are finalized in 30 minutes, with detailed technical drawings produced within 24 hours and mold production completed in 15 days—this rapid turnaround ensures custom fixtures are available for replacement projects with tight deadlines. The company’s annual production capacity of more than 300,000 units ensures reliable supply for both residential and commercial pool projects, with consistent quality across all fixtures.
All SYA Lighting aquatic lighting products are certified to CE, RoHS, and FCC global standards, ensuring compliance with electrical and environmental regulations in more than 50 countries worldwide, and the company has completed over 500 aquatic lighting projects—including residential pools, hotel resorts, and commercial water features—with a 99% customer satisfaction rate. Free professional design consultation is available for all pool lighting projects, with a team of lighting engineers providing guidance on fixture selection, placement, and replacement best practices, and on-site installation support is available for large-scale commercial projects. All LED underwater pool lights come with a 3 to 5 year warranty, covering all components including the LED chip, driver, and housing, and replacement parts such as gaskets and mounting hardware are readily available for fast delivery, ensuring minimal downtime for pool lighting replacement projects.
Post-Replacement Maintenance for Long Fixture Lifespan
Proper maintenance after replacement ensures the new LED underwater pool light delivers its full rated lifespan and remains leak-free for years. Inspect the fixture’s seal and mounting hardware every 6 months for signs of corrosion or loosening, and retighten the mounting bolts if needed (316L stainless steel hardware resists corrosion but can loosen slightly due to pool water pressure changes). Clean the fixture’s glass lens every 3 months to remove mineral buildup and algae, using a soft microfiber cloth and a mild pool cleaner—dirty lenses reduce light output and can cause excess heat buildup in the LED chip, shortening its lifespan. For salt water pools, rinse the fixture with fresh water every 3 months to remove salt buildup, which can degrade the gasket and housing over time.
Avoid using abrasive cleaners or metal scouring pads on the fixture or housing, as they scratch the surface and create areas for corrosion and mineral buildup. If the fixture’s light output dims or flickers over time, inspect the wiring connections in the junction box for corrosion or loosening—these are the most common causes of performance issues in submerged pool lights, and they can be fixed quickly with new waterproof wire nuts and electrical tape. With minimal, regular maintenance, a professional-grade LED underwater pool light from SYA Lighting will deliver reliable, bright illumination for 10 to 15 years, transforming the pool’s nighttime aesthetic while withstanding the harsh conditions of constant submersion.
Replacing an underwater pool light is a manageable process when following industry-standard safety and technical steps, and choosing a professionally engineered fixture ensures the replacement is seamless and the new light delivers long-term performance. The focus on safety, waterproof integrity, and compatibility with existing pool systems is what makes the replacement process successful, and the engineering advantages of professional-grade aquatic lighting fixtures eliminate the risk of premature failure and water leakage. A well-replaced underwater pool light not only restores functionality but also enhances the pool’s nighttime beauty, creating a safe and inviting aquatic environment for years to come.
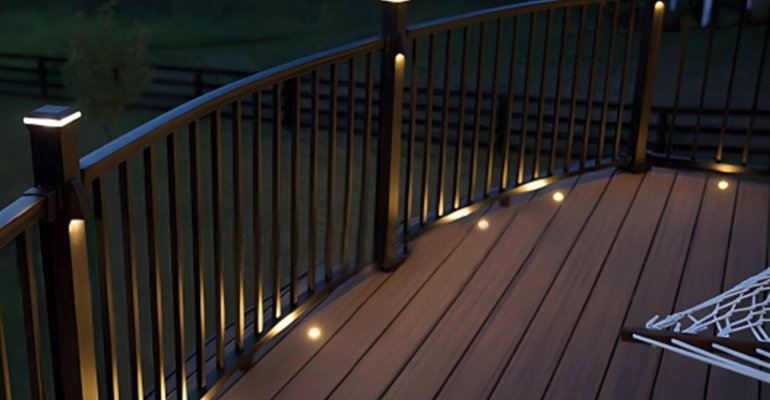
How Long a Deck Light Can Exist?
The lifespan of a deck light is a critical consideration for any outdoor lighting project, as these fixtures endure constant exposure to the elements, physical wear, and environmental stressors that can impact performance and durability over time. Unlike indoor lighting, LED Deck Light units are installed in high-moisture, temperature-fluctuating, and often high-traffic areas—from residential villa staircases and garden decks to commercial hotel walkways and coastal promenades—making their build quality, material selection, and engineering design the primary determinants of how long they can operate reliably. A well-engineered deck light can deliver consistent performance for 8 to 15 years, while lower-quality fixtures may fail in as little as 2 to 3 years due to water infiltration, corrosion, or LED burnout. Understanding the factors that influence deck light lifespan, and the engineering standards that extend it, is essential for creating lighting solutions that stand the test of time and minimize long-term maintenance and replacement costs.
At its core, the longevity of LED Deck Light products is a product of intentional design choices, premium material selection, and adherence to rigorous outdoor lighting engineering standards. Every component—from the LED chip and driver to the housing material and sealing system—plays a role in determining how well the fixture resists the outdoor conditions that cause premature failure. For professional-grade deck lights, lifespan is not just about LED operating hours, but about the ability of the entire fixture to maintain structural and electrical integrity in rain, snow, extreme heat, and even coastal salt air. This holistic approach to durability is what separates industrial-grade deck lighting from consumer-grade options, and it is the foundation of lighting solutions that deliver decades of reliable performance in the most demanding outdoor environments.
Key Factors That Determine LED Deck Light Lifespan
LED Chip and Driver Quality
The LED chip is the heart of any deck light, and its quality directly impacts both luminous performance and operational lifespan. Professional-grade deck lights use high-brightness, high-efficiency LED chips with a rated operating life of more than 50,000 hours—this translates to continuous operation for over 5 years, or more than 10 years with typical nighttime-only use (8 to 12 hours per day). Equally important is the LED driver, the component that regulates power to the chip. A well-engineered driver with over-voltage, over-current, and over-temperature protection prevents electrical damage to the LED chip, extending its lifespan by up to 40% compared to unregulated drivers. Low-quality drivers are a leading cause of early LED failure, as they cannot stabilize power in fluctuating outdoor electrical conditions, leading to chip burnout and inconsistent light output.
Housing Material and Corrosion Resistance
Deck light housings must withstand constant exposure to moisture, UV radiation, and physical impact, making material selection non-negotiable for long lifespan. The industry standard for professional deck light housings is die-cast aluminum, a material that offers superior structural strength, heat dissipation, and corrosion resistance compared to plastic or thin-gauge steel. Die-cast aluminum housings have a tensile strength of 280MPa, resisting dents and cracks from foot traffic, lawn equipment, and other physical impacts, while their natural corrosion resistance is enhanced with UV-stabilized powder coatings that prevent fading and rust in all weather conditions. For coastal environments with salt air exposure, 316L stainless steel hardware and marine-grade coatings are used to eliminate corrosion, a common issue that causes fixture failure in coastal deck lighting projects. Plastic housings, by contrast, become brittle and crack after 2 to 3 years of UV exposure, while thin steel rusts quickly in moist conditions, leading to water infiltration and electrical failure.
Waterproof and Sealing Standards
Water infiltration is the single greatest cause of early deck light failure, as moisture in the fixture housing damages electrical components and causes short circuits. Professional LED Deck Light products adhere to a minimum IP65 waterproof rating, with fully sealed silicone gaskets, tempered glass lenses, and waterproof cable glands that prevent dust and water from entering the housing. For submerged or near-water deck lighting applications—such as poolside decks and fountain surrounds—an IP68 rating is used, allowing the fixture to be continuously immersed in water without damage. The sealing system is engineered with precision, with every joint and opening in the housing sealed to create a moisture-tight barrier, and all cable connections are made with waterproof connectors to prevent water from entering through the wiring. Low-quality deck lights often use cheap foam gaskets that degrade over time, or lack proper cable sealing, leading to water infiltration and fixture failure within 1 to 2 years.
Heat Dissipation Design
LED chips produce heat during operation, and excess heat reduces both their lifespan and luminous efficiency. Professional deck lights feature integrated heat dissipation designs, with die-cast aluminum housings that act as heat sinks to draw heat away from the LED chip and driver. This passive cooling system keeps the LED operating temperature below 25°C, preventing thermal degradation and ensuring the chip maintains its rated lifespan of 50,000+ hours. Fixtures with poor heat dissipation—such as those with plastic housings or no dedicated heat sink—experience LED overheating, leading to color shift, reduced brightness, and early burnout. A well-designed heat dissipation system can extend LED lifespan by up to 30%, making it a critical factor in the overall longevity of the deck light.
Installation and Maintenance Practices
Even the most well-engineered deck light will have a shortened lifespan if installed or maintained improperly. Proper installation includes mounting the fixture on a level, stable surface to prevent water pooling, using corrosion-resistant mounting hardware, and ensuring all wiring connections are sealed and protected from the elements. Regular maintenance—including cleaning the lens to remove dust and debris, inspecting the sealing system for wear, and tightening loose hardware—also extends lifespan by preventing minor issues from becoming major failures. For example, a dirty lens reduces light output and can cause excess heat buildup, while a loose gasket allows water to enter the housing. With proper installation and minimal annual maintenance, a professional deck light can exceed its rated lifespan by several years, while neglectful installation or no maintenance can cut lifespan in half.
The table below outlines the impact of key design and installation factors on LED Deck Light lifespan, with industry-standard data on expected operational years for each scenario:
| Key Factor | Standard Engineering/Installation | Substandard Engineering/Installation | Lifespan Extension |
|---|---|---|---|
| LED Chip & Driver | 50,000+ hour LED, regulated driver | <30,000 hour LED, unregulated driver | 8–10 years |
| Housing Material | Die-cast aluminum with UV coating | Plastic or thin-gauge steel | 6–8 years |
| Waterproof Rating | IP65/IP68 with silicone gaskets | IP44 or lower with foam gaskets | 7–9 years |
| Heat Dissipation | Integrated aluminum heat sink | No dedicated heat sink | 4–6 years |
| Installation & Maintenance | Proper mounting, annual maintenance | Improper mounting, no maintenance | 5–7 years |
| Total Expected Lifespan | 10–15 years | 2–3 years | — |
SYA Lighting: Engineering Advantages for Long-Lasting LED Deck Light Solutions
Premium Material Selection and Precision Engineering
SYA Lighting’s LED Deck Light products are engineered with over 15 years of outdoor lighting expertise, using only the highest-quality materials and precision manufacturing processes to ensure maximum longevity. All fixtures feature die-cast aluminum housings with a thick, UV-stabilized powder coating that resists fading, chipping, and corrosion in all weather conditions, paired with tempered glass lenses that are impact and scratch-resistant. The LED chips are sourced from leading global manufacturers, with a rated lifespan of 50,000+ hours, and are paired with fully regulated drivers with multi-layer electrical protection to prevent damage from power fluctuations. For coastal and high-moisture applications, all hardware is 316L stainless steel, and marine-grade sealing systems are used to eliminate corrosion and water infiltration—ensuring the fixture performs reliably even in the most demanding outdoor environments.
Industry-Leading Waterproof and Sealing Technology
Waterproofing is a cornerstone of SYA Lighting’s deck light design, with all fixtures meeting or exceeding IP65 waterproof standards, and IP68 options available for submerged applications. The sealing system features high-quality silicone gaskets that do not degrade over time, precision-machined housing joints that create a perfect moisture-tight fit, and waterproof cable glands and connectors that prevent water from entering through the wiring. Every fixture is pressure-tested for water resistance before leaving the factory, ensuring that the sealing system performs as intended in real-world conditions. This rigorous approach to waterproofing eliminates the single greatest cause of early deck light failure, and it is a key reason why these fixtures deliver 10 to 15 years of reliable performance with minimal maintenance.
Customization and OEM/ODM Capabilities
SYA Lighting offers comprehensive OEM/ODM customization for LED Deck Light products, with size, shape, lighting, and mounting design customization to meet the unique requirements of any project. Design concepts for custom deck lights are finalized in 30 minutes, with detailed technical drawings produced within 24 hours and mold production completed in 15 days—enabling rapid turnaround for custom projects and tight deadlines. The company’s annual production capacity of more than 300,000 units ensures reliable supply for large-scale commercial, municipal, and hospitality projects, with consistent quality across all fixtures. Customization does not compromise durability, as all custom deck lights adhere to the same rigorous engineering and material standards as standard models, ensuring long lifespan regardless of design modifications.
Advanced Heat Dissipation and Energy Efficiency
All SYA Lighting deck lights feature integrated heat dissipation designs, with die-cast aluminum housings that act as efficient heat sinks to keep LED operating temperatures below 25°C. This passive cooling system eliminates the need for noisy and unreliable active cooling fans, and it ensures the LED chip maintains its rated lifespan and luminous efficiency for the life of the fixture. The LED chips deliver a luminous efficiency of 120–140 lm/W, 60% higher than traditional lighting technologies, translating to significant energy savings and reduced operating costs. The combination of high energy efficiency and long lifespan makes these deck lights a sustainable lighting solution, with a low total cost of ownership over their operational life.
Comprehensive Global Certification and Technical Support
All SYA Lighting LED Deck Light products are certified to CE, RoHS, and FCC global standards, ensuring compliance with electrical and environmental regulations in more than 50 countries worldwide. The company has completed over 500 outdoor lighting projects across the globe—including residential villas, boutique hotels, commercial plazas, and coastal promenades—with a 99% customer satisfaction rate. These field-tested projects validate the durability and performance of the deck light fixtures in diverse climates and applications, from cold northern regions to hot, humid tropical areas and coastal salt air environments.
SYA Lighting provides end-to-end technical support for all deck light projects, with free professional design consultation from a team of lighting engineers to guide fixture selection, mounting design, and installation best practices. On-site installation support and technical training are available for large-scale projects, ensuring that the fixtures are installed correctly to maximize lifespan. All deck light products come with a standard 3 to 5 year warranty, covering all components including the LED chip, driver, and housing—providing peace of mind for long-term project performance. Replacement parts are readily available for fast delivery, and the 24/7 customer support team is on hand to answer technical questions and provide maintenance guidance.
Maintenance Practices to Extend LED Deck Light Lifespan
Even with the most advanced engineering, regular maintenance is key to maximizing the lifespan of LED Deck Light products, and the good news is that professional-grade deck lights require only minimal, annual maintenance to perform at their best. The first and most important maintenance step is cleaning the lens and housing to remove dust, dirt, and debris—this not only restores maximum light output but also prevents heat buildup that can damage the LED chip. The lens can be cleaned with a soft, damp cloth and a mild soap solution, and the housing can be wiped down to remove dirt and grime, with care taken not to damage the powder coating or sealing system.
Second, inspect the sealing system for signs of wear or damage, including cracked gaskets, loose housing joints, or damaged cable connectors. Replace any worn gaskets immediately, and tighten loose housing hardware to maintain a moisture-tight seal. For coastal applications, rinse the fixture with fresh water every 6 months to remove salt buildup, which can cause corrosion over time. Third, inspect the mounting hardware and re-tighten any loose screws or anchors—this prevents the fixture from becoming loose or misaligned, which can cause water pooling and physical damage. Finally, test the light’s performance annually, checking for consistent brightness and no flickering, which can indicate a failing driver or LED chip that requires replacement.
With these simple maintenance practices, a professional LED Deck Light can exceed its rated lifespan of 10 to 15 years, delivering reliable performance for decades. The minimal maintenance requirements of these fixtures also reduce long-term operational costs, as there is no need for frequent bulb replacement or complex component repairs—unlike traditional halogen or fluorescent deck lights, which require regular bulb changes and have a much shorter lifespan.
The Long-Term Value of Durable Deck Lighting
Investing in a well-engineered, long-lasting LED Deck Light is not just about avoiding frequent replacement and maintenance—it is about creating a lighting solution that delivers consistent performance, enhances outdoor spaces, and provides long-term value for any project. A durable deck light transforms outdoor areas, from residential decks and gardens to commercial walkways and plazas, by providing safe, ambient lighting that highlights architectural and landscape features while withstanding the test of time. The energy efficiency of LED technology further adds to the long-term value, with significant savings on electricity bills compared to traditional lighting technologies.
SYA Lighting’s deck light solutions are designed with this long-term value in mind, combining premium materials, precision engineering, and industry-leading durability to create fixtures that perform reliably for 10 to 15 years or more. The company’s focus on customization, global certification, and comprehensive technical support ensures that every deck light project is tailored to the unique needs of the space, with a lighting solution that is as functional as it is durable.
Deck lighting is an essential element of any outdoor space, and its lifespan should be a primary consideration in the design and selection process. By choosing a professionally engineered LED Deck Light with premium materials, industry-leading waterproofing, and a focus on durability, you create a lighting solution that stands the test of time, minimizes long-term costs, and delivers consistent performance for years to come. The right deck light is not just a fixture—it is a long-term investment in the beauty, safety, and functionality of outdoor spaces.